


How to Configure a Protection Object: IP Addresses, Load Balancing, SSL, and Caching
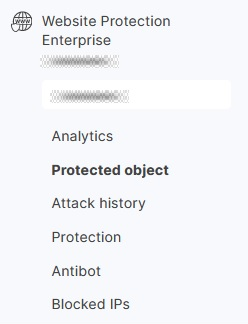
In the left-hand menu, select Protected Object.
On the page that opens, you’ll see configurable parameters that you can adjust to fit your needs or preferences:
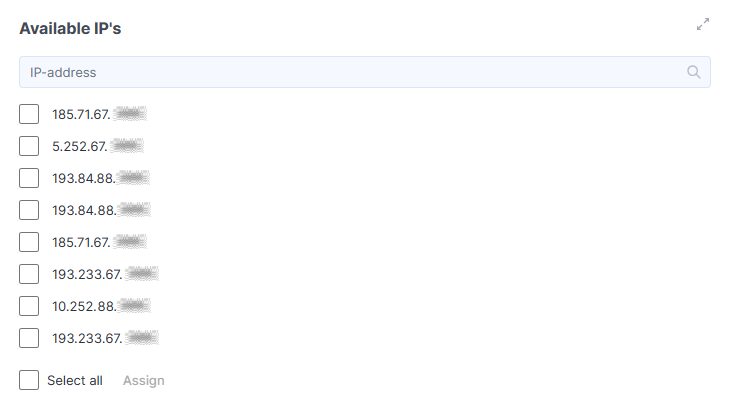
Available IP’s
On the page that opens, you will find configurable parameters, including Available IPs. To assign an IP address from the list, check the box at the beginning of the row and click Assign. We will provide you with several IP addresses, and you can assign them to your domains yourself.
Assigned IP’s
You can remove IP addresses from the list of assigned ones. To do this, select the address you no longer need by checking the box at the beginning of its row, then click Delete.

Proxied Ports
This section is designed to manage listening ports and distribute traffic among backends. A backend is your server located behind the protection system.
How It Works
- A user sends a request to your domain.
- The domain’s DNS record points to the assigned IP address (provided by our system).
- The request reaches our filtering node.
- The system cleans the traffic and forwards it to the backend using the IP address and port you specified.
- The backend processes the request and returns the response to the user through the protected system.
First configure your backends and certificates in your personal account (as described below).
Only after all ports and backends have been added and verified should you change your domain’s A record to the protected IP address.
Each row in the table represents one listening port (listen port) with one or more backends. At the end of each row there are management tools – pencil (edit) and cross (delete) icons.
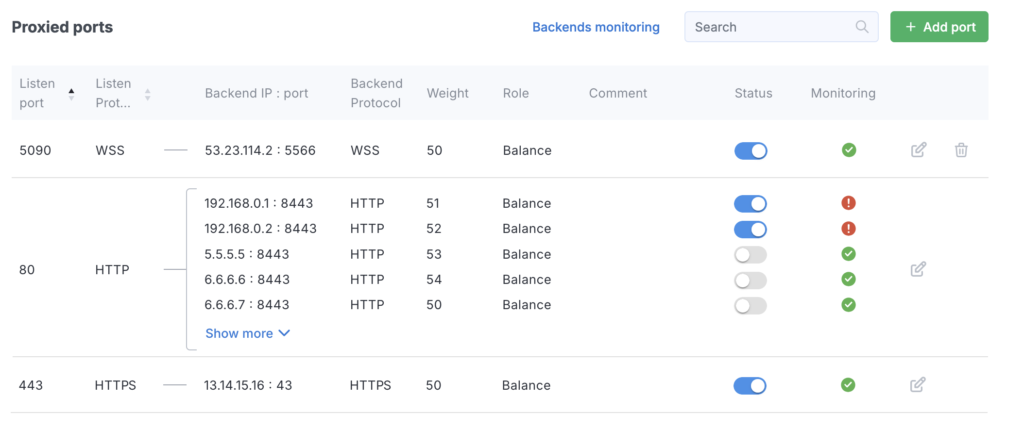
The table contains the following columns:
- Listen port – The port on which the protection system accepts incoming requests from users (usually 80 for HTTP, 443 for HTTPS).
- Listen protocol – The protocol of incoming traffic.
- Backend IP : port – The IP address and port of your real server (where the cleaned traffic should be forwarded).
- Backend protocol – The protocol used between the protection system and your backend.
- Weight – The backend’s weight for load‑balancing algorithms.
- Role – The server’s role (balance or backup).
- Comment – A description of the backend.
- Status / Monitoring – The current state of the backend and its activity toggle.
Adding a New Port and Backends
To create a new configuration, click the Add port button. In the modal window that opens, follow these steps:
- Configure the listening port: In the Basic settings area, specify the port number (Listen port) and select the protocol.
- Add backends:
- Click + Add backend.
- Enter the backend IP address and port in the input field.
- Confirm the action by clicking the checkmark in the new backend row.
- Save the changes: To apply the entire configuration (the port and all added backends), click the Save button.

Balancing
If a port has several backends with the balance role, traffic is distributed among them proportionally to their weights.
If all balance‑role backends are disabled or unavailable, the system begins sending traffic to backends with the backup role.
Backup servers do not participate in load balancing as long as at least one balance‑type server is available.
With three servers weighted 5, 1, and 1, out of seven requests:
To change the primary backend for a domain protected by the WAF, please contact technical support. Our specialists will apply the change as quickly as possible.
Protocol and SNI Configuration
The system includes automatic logic for selecting parameters depending on the protocol:
- SSL protocols (HTTPS, WSS): When you select these for the backend, the HTTPS/WSS protocol is automatically activated and SNI is enabled.
- Plain protocols (HTTP, WS): In this case the SNI function becomes unavailable (disabled in the interface).
Despite the presets, you can manually change the state of the HTTPS and SNI toggles for each backend if needed.
- Set the HTTPS toggle to ON if your server processes HTTPS traffic on that port (e.g., 443).
- Set the Proxy SNI toggle to ON to enable forwarding of the requested site name (domain) to the protected server. Note that this toggle is available only when HTTPS is used between the protection service and your backend server.
The Proxy SNI toggle should be set to ON if your backend server expects SNI in incoming TLS handshakes.
Backend Monitoring
In the Monitoring column, the backend status is displayed:
- A red exclamation mark indicates a problem with the backend (hover over the icon to see a description of the issue).
- A green check mark means the backend is being monitored and no issues have been detected.
- No icon means the backend is not set up for monitoring.
Click the Backend monitoring button to go to the monitoring settings. Open the Settings tab.
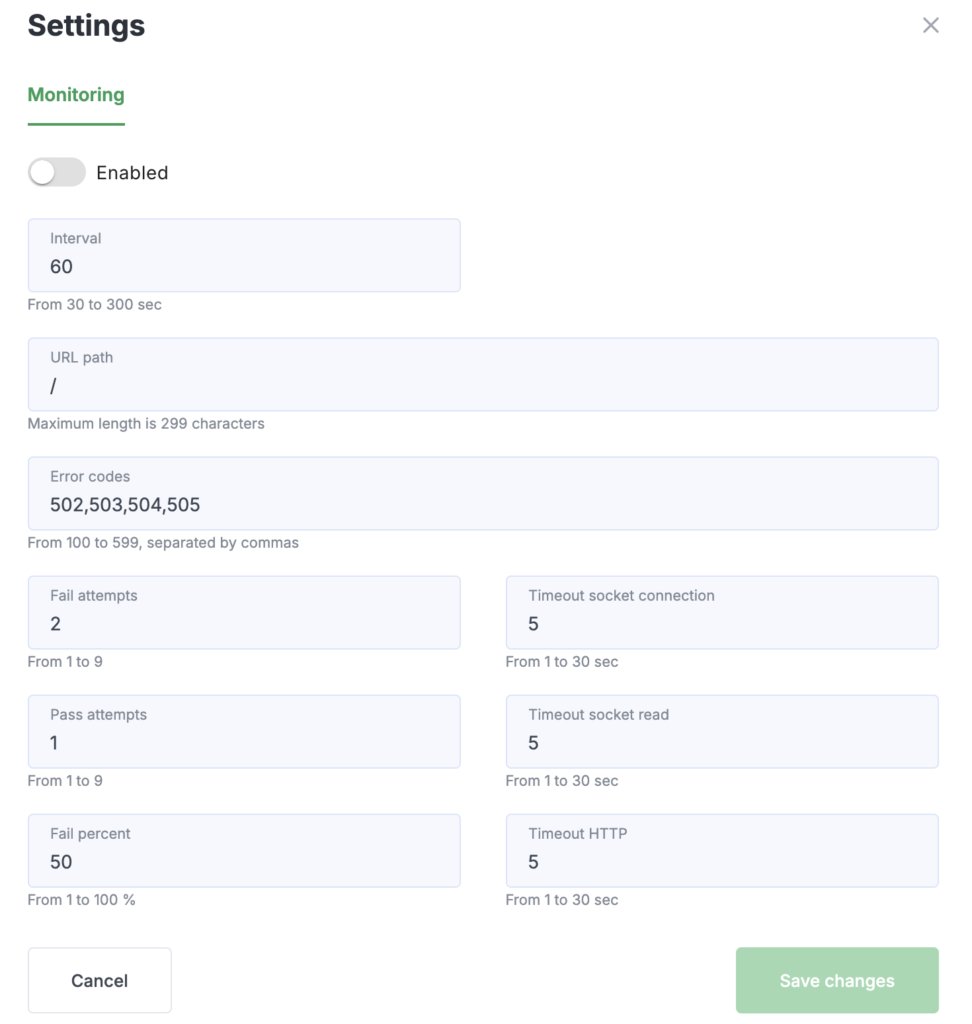
In the window that opens, you can use the toggle to enable or disable monitoring for backends, as well as configure the following parameters:
- Interval — frequency of backend health checks (in seconds);
- URL Path — the endpoint for monitoring, where HTTP requests are sent;
- Error codes — list of HTTP status codes considered indicative of unavailability;
- Fail attempts — how many consecutive failed attempts will mark a backend as unavailable;
- Pass attempts — how many consecutive successful attempts will mark a backend as available;
- Fail percent — the percentage of failed checks from the total number required to declare a backend unavailable (this parameter helps avoid removing a backend from load balancing if it is unreachable from only one of several monitoring locations);
- Timeout socket connection — timeout for establishing a TCP connection;
- Timeout socket read — timeout for reading data from a socket;
- Timeout HTTP — overall timeout for the HTTP request execution.
To improve the reliability of results, we recommend specifying a value greater than 1 in the Number of failed attempts and Number of successful attempts fields.
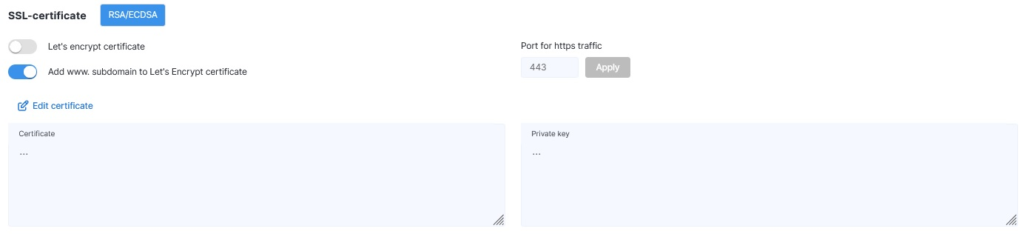
SSL certificate
You can obtain a free SSL certificate (from Let’s Encrypt) or install your own. You can also enable or disable redirection from HTTP to HTTPS (or vice versa) to help reduce the load on the origin server.
Own Certificate
To inspect SSL traffic, you need to specify both the public key certificate and the private key. On the screen, these will be displayed in truncated form (to prevent copying). You must also provide the root and intermediate CA certificates (if applicable).
If you are using your own certificate, you will need to update it manually when it expires.
Note: All SSL certificates must begin with “BEGIN CERTIFICATE” and end with “END CERTIFICATE”. The certificate authority typically provides this set of files marked “For Apache/Nginx”. The domain’s private key must start with the header “BEGIN RSA PRIVATE KEY”.
Before pasting the certificate into the form field, make sure the Let’s Encrypt Certificate toggle is set to OFF.
If you receive a certificate validity error, check the following:
- Verify the certificate fields (Common Name, SANs, Validity period).
- Use openssl to compare the hashes of the certificate and key.
- Check the entire certificate chain to ensure it validates correctly.
Free New Certificate
If you don’t have a certificate or prefer not to enter its data into your personal account, you can enable the Let’s Encrypt Certificate option. In this case, client keys will be generated and a public key certificate will be issued for the protected server. The certificate and key will be automatically regenerated and replaced ten days before they expire.
To use this type of certificate, the domain’s primary A record, as well as its www.\* record, must point to the assigned protected IP address.
The certificate will be installed automatically within a few minutes. If you receive a DNS record mismatch error, please wait — domain zone updates may take anywhere from 15 minutes to several hours, depending on the TTL value previously set in the domain’s A record and your internet provider’s DNS update frequency.
Cache
Thanks to caching, your website will become not only more reliable but also faster.
Static content is cached in the RAM of StormWall’s scrubbing center servers, which significantly reduces the load on the origin server.
You can set the cache lifetime and choose which file types to cache. If you need additional parameters (such as geographic restrictions), please contact technical support.
To enable caching, select the cache lifetime and file extensions, then switch the Cache toggle to the ON position.
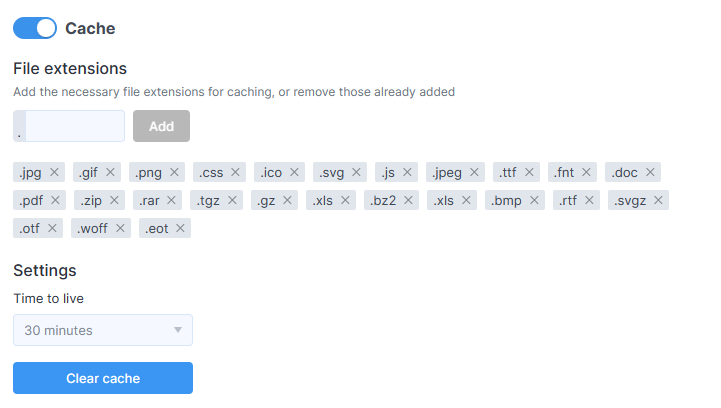
When you press the Clear cache button, all data will be reloaded from the resources anew.
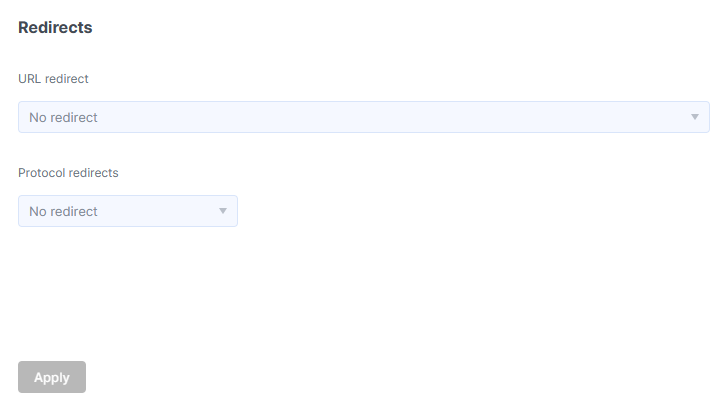
Redirects
Configure the rules for redirecting traffic between different addresses.
For example, here you can set up a redirect from “http” to “https”.