


What is an API?
An API (Application Programming Interface) is an interface that enables two applications to interact with each other using a predefined set of commands.
The API allows you to manage objects within ordered services — such as adding and removing domains, updating configuration parameters, retrieving attack history, and more. Through this interaction, you can also retrieve or add information to your personal account, automatically extract service lists, manage user blacklists and whitelists, and much more.
Detailed descriptions of commands and data models for requests and responses are available at this address:
https://api.stormwall.pro/v3/api/
Migrating to StormWall API v3… ▾
When migrating to StormWall API v3, note the change in the authorization type:
| API v1/v2 | API v3 | |
| Header | cookie | x-api-key |
| Value | api_access_token=XXXX | XXXX (your API key) |
The previously used versions were:
- StormWall API v1 — https://api.stormwall.pro/documentation
- StormWall API v2 — https://apiv2.stormwall.pro/swagger-public
API v1 and API v2 have been moved to legacy status and will no longer receive updates. These versions will be completely discontinued in the future.
To access new features, please migrate to the current version — API v3.
How to Create a Token?
To ensure secure access to information in your personal account, authentication is implemented using tokens.
When your device requests information, it will be authenticated using an authentication token, similar to how you use a login and password to access your personal account.
Go to the new control panel using any of the options available in your personal account. Open the Users tab in the top-left section of the screen. This will display the menu options: Users, Roles, and API Tokens.
Tokens created in the new personal account are valid without expiration.
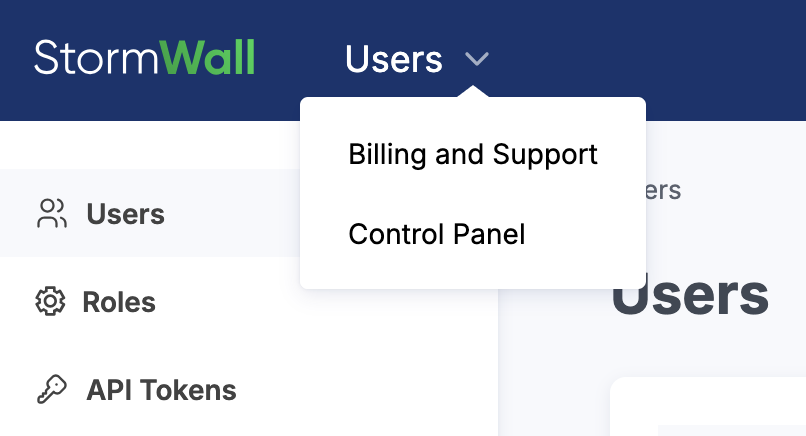
Click on API Tokens.
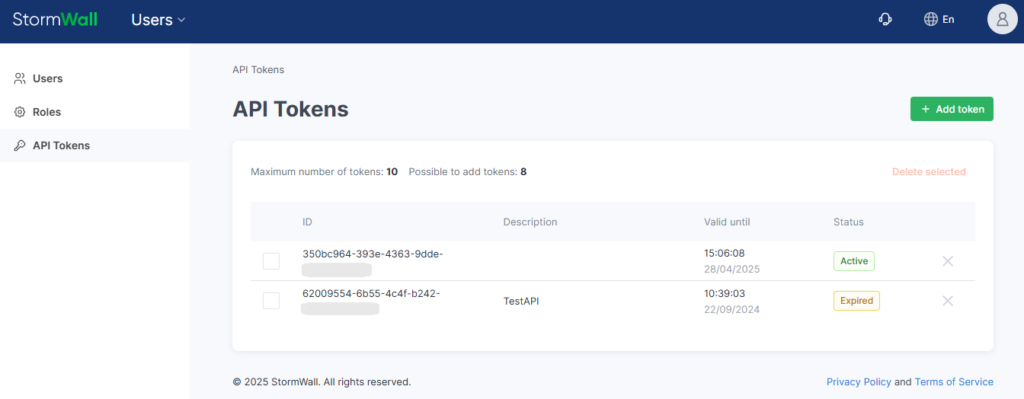
On the page that opens, you can add or delete tokens.
To add a new token, click + Add Token.
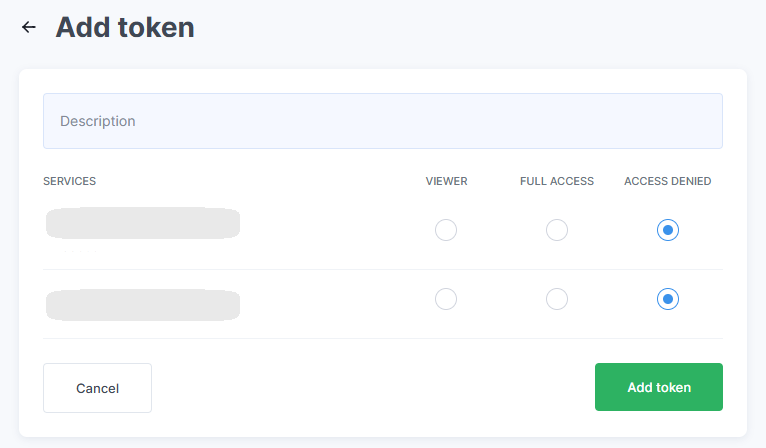
Select the access permissions for the token. You may add a description in the Description field or leave it blank.
Click Add Token.
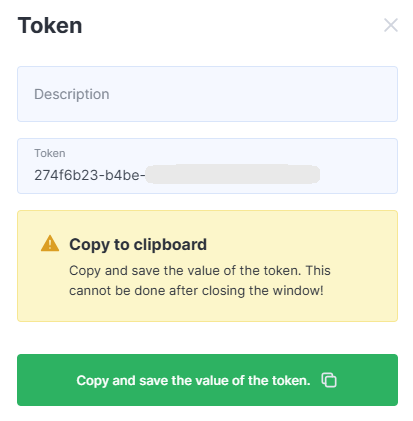
Be sure to copy the generated token — click Copy to Clipboard and Close.
A new row with the status “Active” will appear in the token table.

You can delete expired tokens by selecting them and clicking Delete Selected.

Each token has a unique ID, which can be used to identify actions performed with that token (e.g., creation, deletion) in the request log.
API Interface Description
The API uses a REST interface and relies only on built-in HTTP functions, which are supported by any standard HTTP client..
- For easier proxying and monitoring, object identification data is always included in the URL path.
GET /user/service/1/domain/2
- For lists in read commands, request parameters with repeating keys are used.
GET /user/service/1/domain/stats?domain_id=3&domain_id=6.
- All other data for modification commands is sent in the request body in JSON format.
- Responses are always returned in JSON format, including error messages, except for conversion commands.
Request Size Limits:
- Maximum request body size: 1 MB
- Maximum header size: 8 KB
Error Handling in the API
There are two levels of error indication in the system:
- HTTP status code
- Error code list in the response
- An HTTP status other than “200” indicates a critical error from either the user or the system.
- If the HTTP status is “200”, the error list contains only non-critical errors (warnings).
If the API returns a critical error, no actions are performed on the objects, and the request can be retried, possibly with corrected data.
- Example: If a command requires a domain name, but an invalid string (e.g., with spaces) is submitted, the API will return “400” (“Bad Request”).
If at least one non-critical error appears in the list, it means some operations have already been performed, possibly on physical hardware. These errors do not cause object malfunctions but may require additional actions.
If installing an SSL certificate returns a non-critical error, it means that while the certificate format is correct, the system refused to install it for the specified domain because the domain name does not match the certificate records.
HTTP Methods and Their Actions
| HTTP Method | Action |
| POST | Create a new object |
| GET | Retrieve object information |
| PUT | Update object information |
| DELETE | Delete an object |
{ “statusCode”: 400, “error”: “Bad Request”, “message”: “Invalid request params input” }
HTTP Response Status Codes
| Status Code | Description |
| 200 | Request successfully executed |
| 400 | Invalid command input data |
| 403 | Command or input data is not allowed for the specified token |
| 404 | Command not defined in the system |
| 405 | Method not applicable to this command |
| 501 | This command is under development |
| 503 | System functionality is currently unavailable or request limit exceeded |
| 500+ | Internal system errors |
{ “error_list”: [{ “type”: “SSL”, “code”: “INVALID_CERT_KEY_PAIR” }] }
API Authentication and Token Usage
Most commands require authentication via an API token. The token is passed using the Cookie header with the name api_access_token.
Getting Started with API Token Authentication
Most commands require authentication via an API token. The API token must be passed in the Cookie header with the name api_access_token.
To start working with the API, begin by creating a token.
To test requests, you can open any endpoint in the Swagger documentation and enter the active token value in the cookie field as api_access_token=eyJhb…. After filling in all other endpoint parameters, click the “Try it out” button, which will generate a curl request string.
The curl string is generated for Linux systems. On Windows, all ' (single quotes) must be replaced with " (double quotes), and inner quotes must be escaped. Alternatively, you can use a Linux-like terminal, such as Git Bash.
In the API documentation, you can view the data model for each command’s response and complex parameters by switching to the Schema tab. The models specify field types and include brief descriptions.
Let’s examine the request parameters using the example of /v3/attack-history.
| Parameter | Description |
| limit | Limits the number of returned items. Used for pagination. |
| offset | Specifies the starting position for data retrieval. Used together with limit to fetch subsequent “pages” of data (e.g., with limit=100, offset=100 will return items 100 through 199). |
| search | Filters the results to include only items containing the specified substring. |
| fromTime | Lower time bound. Returns attacks that started on or after the specified time. |
| toTime | Upper time bound. Returns attacks that started on or before the specified time. |
| addActive | Flag to include active attacks in the search results. |
| sortBy | The field by which the results are sorted. |
| sortDirection | Sort direction: ascending (asc) or descending (desc). |
| layer | The network attack model layer: network (L3) or application (L7). |
If you encounter any difficulties using the API, please contact our support team via the website chat or the request form in your personal account.